
Classroom Instruction manual for student-use PCs
Center's terminal environment
Information and Media Center provides students with common-use PCs in computer room1 and 2,Self-study Computer Room,Multimedia Classroom, and the Library workstation Area (first floor). These PCs are installed with Windows10 for operating system and various Windows application software packages such as Microsoft Office and Visual Studio. In addition, by logging in to the Linux server, the user can use these PCs under the Linux environment. User’s personal files and information are not stored on the individual PCs, but on the server. Thus, users can operate any PC under an individual same environment.
To use a PC, a user must obtain an account. A user account represents an authorization to use a PC, and each user has distinguished by his/her user name. To start using a PC, a user must enter his/her password granted to his/her account to verify his/her identity. The password must be kept confidential, just like a password for an ATM card, and should not be disclosed or left in a memo. The university requests that its users periodically change their passwords to maintain security. For more details about changing passwords, see here.
Basic instructions
1.Startup
Press the power button on the top right of a PC in horizontal or on the top left of a PC in vertical.
2.Login/Logon
Enter your user name and password int the 〔ユーザー名〕(username) and 〔パスワード〕(password box),and press Enter.
3.Disk information
| Each user’s home directory | Z drive in Windows |
| Disc capacity | 20 GB |
4.Saving files
Each user must save own files to the user’s home directory (Drive Z).
[Note] Any files saved to a destination other than the home directory (Drive Z), such as the desktop area, will be deleted when the PC is turned off.
Files saved to the home directory (Drive Z) will be retained even after the user logs out, and will be accessible and editable when the user logs in again later. The files are not saved on your individual PC but in the file server, so that. they are accessible via any PC.
5.Folder/file name
It is recommendeds that do not use double-byte characters, Kanji, or Japanese characters for their folder and file names, which may not be viewable under the Linux environment.
Do not use a dot or period (.) for the folder or file names, since they are usually used to precede file extensions.
6.Sign out
Sign out refers to the termination of PC operation. Once the user has signed out, the PC will return to its state before signing out. Users must sign out when suspending their operation or leaving their seat for a while. Leaving your seat without signing out from enables uncontrolled operation of the PC by a third party. Your personal data may be deleted or spoof e-mails may be sent using your ID. To avoid such problems, you must always sign out when you leave your seat. If you finish using the PC, instead of leaving your seat, you must shut down the PC in the following procedure.
7.Shutdown
Click the Start Menu (Windows icon) on the bottom left of the screen and select Shutdown. Turning off a PC by pressing the power button or pulling out the power cable without conducting the above steps while the PC is still in operation may jeopardize the data you are editing or may damage the PC itself. Please follow the steps above.
8.Available application
Currently, Information and Media Center provides the following application software on Windows OS PCs:
| Application | Version |
| Microsoft Office Professional Plus | 2019 |
| Cygwin | |
| Intel oneAPI | 2023 |
| Microsoft Visual Studio Professional | 2019 |
| Eclipse | |
| Amazon Corretto | |
| MATLAB | R2022a |
| R | 3.6.1 |
| Python (Anaconda) | 3.7.3 |
| CUDA | 10.1 |
| cuDNN | 7.6.2.24 |
| Atom | 1.39.0 |
| Visual Studio Code | 1.36.1 |
| WinSCP | 5.15.3 |
| AutoCAD | |
| Autodesk Fusion 360 | |
| NC Viewer and Converter | 3.83b |
| LEGO MINDSTORMS Education EV3 | 1.4.2 |
| ChemOffice | 18.2.0.48 |
| GaussView | 6.0.16 |
| ArcGIS Desktop | 10.5.1 |
| ArcGIS Pro | 2.0.1 |
| OneCNC-XR8 Mill 3D Expert | |
| CorelDRAW Graphics Suite X7 Education | |
| SIS | 8.0 |
| CCAS(クライアント) | |
| GOW for windows |
Printer
1.Printer locations
| Computer Room 1 | 1 unit | A4 sheets only. A3 sheets cannot be printed. |
| Computer Room 2 | 1 unit | Both A4 and A3 sheets can be printed. |
| Self-study computer Room | 1 unit | Both A4 and A3 sheets can be printed. |
| Multimedia Classroom | 1 unit |
A4 sheets only. A3 sheets cannot be printed. |
These printers can print PostScript (xxx.ps) files.
2 Printing instructions
(If the green power-saving button is lit, cancel the mode by pressing the button.)
- On the PC, select the “tutprinter” printer and click Print.
- Pass your student ID card over the printer’s card reader.
- Select On-demand Print.
- Select the file to print and push Print.
- Push Verify button after printing. Alternatively, if another student passes his/her ID card over the card reader, your session will finish.
2.1. Notes
- You can print from any printer in your classroom. You can print from a printer in another terminal room if the printer in the classroom is busy with many print jobs.
- Please print within 24 hours after sending your print job. Your print job will be removed from the on-demand printing list after 24 hours.
3. Limit of printable sheets,and how to check the remaining number
-
The maximum number of printable sheets per person is 300 for monochrome printing. Color printing are assigned a much page counts than monochrome. So please aware of the limit when you print.
- Before printing, limit number of printable sheets and the remaining number are shown on the screen.
-
Or you can log in to your personal settings page to check the printed number of sheets and the remaining number. You can also check or cancel your print jobs here.
- If you exceed the limit number of sheets you, please submit the Application to expand the number of printable sheets
 ,with the seal and signature of a faculty member, to Counter of Information and Media Center.The application form is available in the hallway on a counter.
Linux environment
Information and Media Center enables users to use a Linux environment by logging in to the Linux server from a Windows PC.
Under the Linux environment, your home directory will be Driver Z of Windows PC. You can easily edit a Windows file under the Linux environment or vice versa. You can continue using Microsoft IME for input method. It is also possible to copy and paste between the Windows and Linux environments without problem.
1. Login / logon
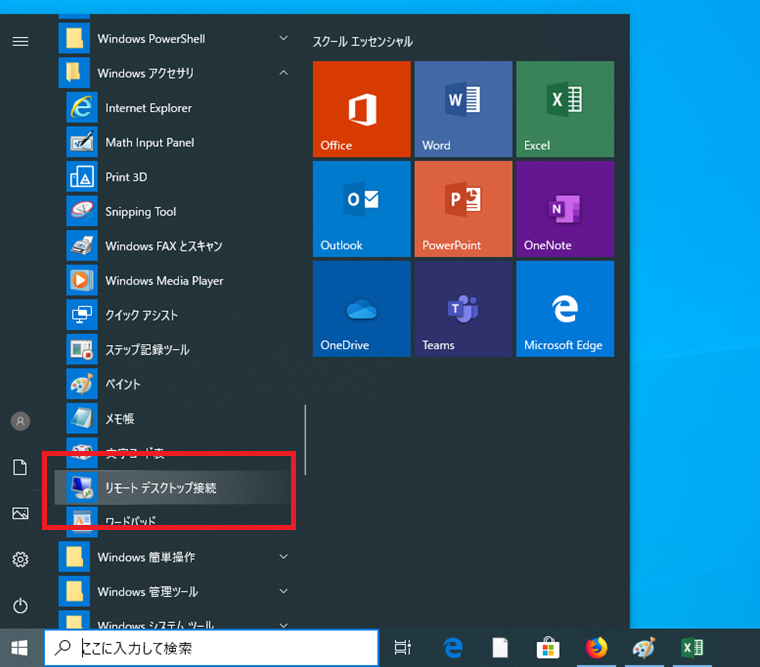
1. Start Remote Desktop Connection application from the Start menu.
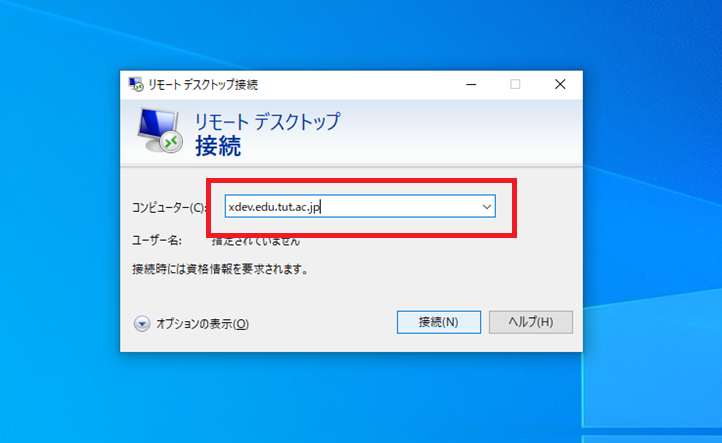
2. Input "xdev.edu.tut.ac.jp" as the computer name and click "Connect".
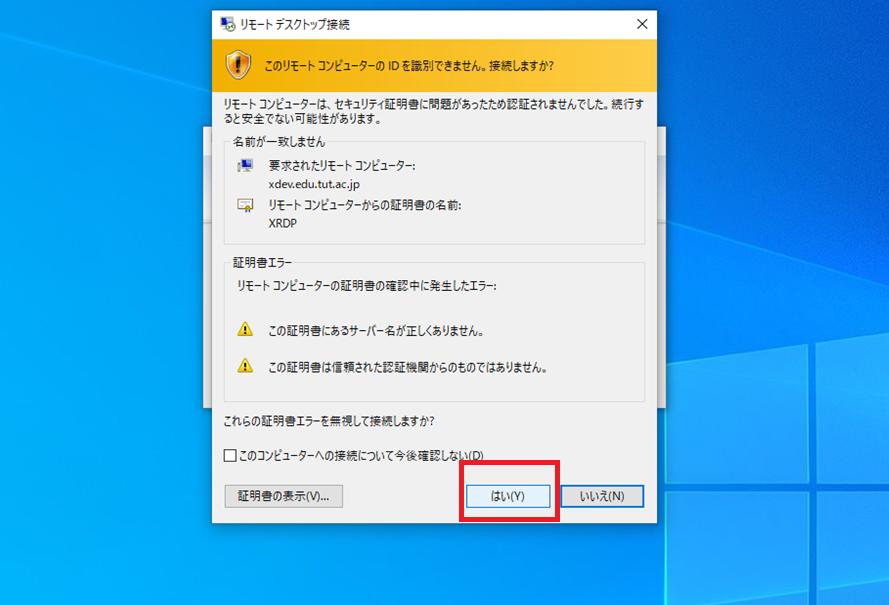
3. Ignore several warning dialogues and click 'OK'.
4. After a while, a login dialog box will appear asking your username and your password. Enter them and click OK.
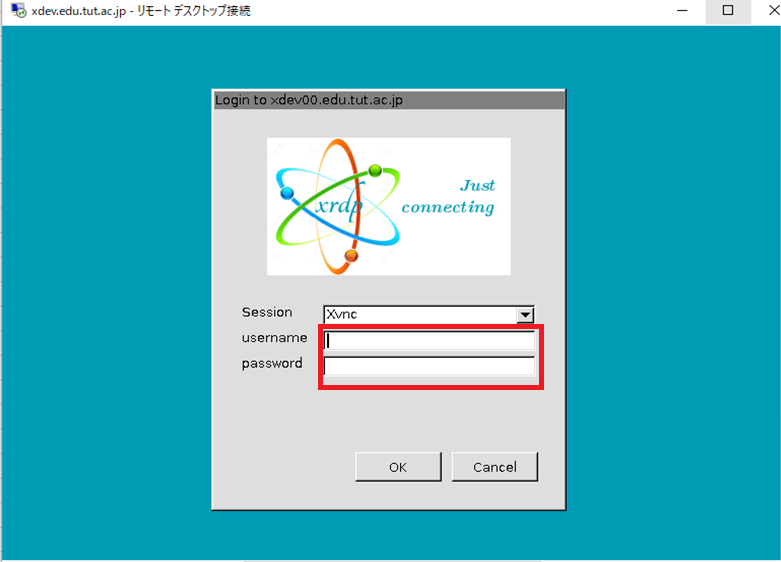
5. After verification of username and password,Linux Desktop screen, which works in the Remote Desktop Connection application, will appear. Then, you can use the PC same as a conventional Linux machine.
5.2. Command screens
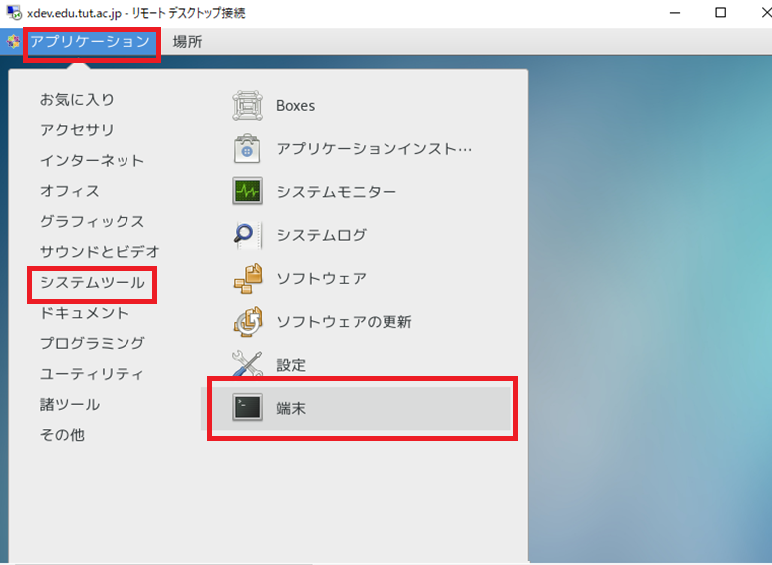
1. How to startup
Click application menu at the top left of the remote desktop connection screen and select "System Tool" or "Terminal" from the menu that appears.
2. How to exit
Enter “exit” in the command prompt screen.
% exit
3. UNIX commands
In UNIX, you can combine multiple commands to perform your intended operation. In the meantime, you can use one command in different ways by changing its options.
For example, enter “man man” on a command prompt screen.
An execution example of the “man” command
% man man
man(1) man(1)
名称
  man - リファレンス・ページを表示します.
形式
  man [-] [-M | -P pathname] [-t] [ section[suffix] ] title ...
  man [-] [-M | -P pathname] [-t] [ section[suffix] title ...]...
  ... (略)
Press Space to continue reading. Press “q” to exit. In this way, the explanation (online manual) of the “man” command will appear on the screen. In UNIX, online manuals for UNIX commands and C language functions are available on the screen. Enter as follows to display the online manual for other commands.
% man コマンド名
Make it a habit to read the relevant manual when you encounter a question during operation.
3. Basic commands
The following table describes the basic commands to operate the file directories.
| pwd | Show the location of the directory you are using. |
| ls | Show the file directories existing in the directory. |
| cd | Move a directory. |
| mv | Move a file. You can also change a file name by this command. |
| cp | Copy a file. |
| rm |
Delete a file. |
| mkdir | Create a new directory. |
|
rmdir |
Delete a directory. |
| cat | Show the contents of a file. |
| less | Show the contents of a file.Unlike with “cat,” you can interactively operate the indicated contents. |
| ps | Show the currently running process. |
| kill | Exit the currently running process. |
Many websites offer instructions on the UNIX commands. For more information on operation, visit these sites.
-
Linux commands encyclopedia http://www.21linux.com
-
How to use Linux http://merry.whitesnow.jp/SEMICMD/cmdtop.html
-
Linux standard textbook http://www.lpi.or.jp/linuxtext/text.shtml
4.UNIX file system
In UNIX, a text file, a directory, and hardware such as an HDD and a mouse are expressed as files. These files constitute a tree structure with the root (/) directory at the top.
In UNIX, the following special directories are expressed by special symbols.
| Current directory | . | Show the directory you are using. |
| Parent directory | .. | Show the superior directory above the directory you are using. |
| Home directory | ~ | This is the directory that contains your files. This is the first directory you will use after login. |
| Root directory | / | This is the top-level directory. All files are placed under this directory. |
To specify a file in UNIX, you can use either a relative path or an absolute path. The relative path and the absolute path specify the file location, starting from the current directory (.) and the root directory (/), respectively.
The following example shows a directory structure with the current directory “/ant.”
/
|-- ant
|   |-- a
|   `-- dog
|       `-- b
|-- bear
|   `-- c
`-- d
Files expressed in the relative path and the absolute paths are as follows:
| Relative path | Absolute path | |
| a | a | /ant/a |
| b | dog/b | /ant/dog/b |
| c |
../bear/c |
/bear/c |
| d | ../d | /d |
You must note that the file location expressed in the relative path varies by the position of your current directory. If you encounter a problem such as a previously running program stopping after changing location, you may need to check the file path specification again.
5. Access authorities of files
In UNIX, each file requires access authority. The authority controls who can read, write, and execute the file.
To see the settings of the authority, you can enter the “ls” command with the “-l” option.
% ls -l
合計 12
drwxrwxr-x  3 taro student 4096  4月  6 17:31 ./
drwxr-xr-x 25 taro student 4096  4月  6 17:30 ../
-rw-rw-r--  1 taro student    0  4月  6 17:31 bar
drwxrwxr-x  2 taro student 4096  4月  6 17:31 foo/
The authority is expressed in the “drwxrwxr-x” part at the beginning of each line. Each character in the “drwxrwxr-x” part represents the following.
| d | rwx | rwx | r-x |
| File type. The character “d” represents a directory. | Owner privilege. | Privilege of user in the same group. | Privilege of other users. |
Each character in the user authorities of “r-x" represents the following. The character “-” represents no authorization.
| r | Readable |
| w | Writable |
| x | Executable |
Make sure to set an appropriate access authority on your own files and directories. To change the file access privilege, use the “chmod” command.
For example, to conceal the contents of a file named “bar” from other persons, enter as follows.
% chmod go-rwx bar
% ls -l bar
-rw-------  1 taro student    0  4月  6 17:31 bar
Compare the privilege on the file “bar” in the previous example. The privileges of all other users except you have been deleted.
On the other hand, to make the file available for reading and writing by all users, enter the following command.
% chmod ugo+rw bar
% ls -l bar
-rw-rw-rw-  1 taro student    0  4月  6 17:31 bar
As shown in the example, the “chmod” command specifies the authorities as follows:
- First, set the user (owner: “u”; same group: “g”; or other: “o”).
- Then, set the authority (grant: “+”; or deny: “-”).
- Finally, set the type of authority (readable: “r”; writable: “w”; and executable: “x”).
Or, you may specify the authority by using numbers, such as 755 or 644. For more details on the usage, please study the “man” command.
6.Printing instructions on the command screen
The following section describes how to print a file under the Linux environment. To print a file under the Linux environment, the target printing file must be converted to a PostScript format. The following examples show how to convert image files.
% convert image.jpg image.ps
Or
% convert image.gif image.ps
The files will be converted to the PostScript format.
To print a PostScript file, use the “lp” command.
% lp [印刷したいファイル]
The “lpstat” command shows the printer status and the progress of your print job.
% lpstat
If you do not specify a printer,same as with the Windows environment, the printer nearest to your PC will start printing. If your nearest printer is busy, you can explicitly specify the output printer as follows
% lp -d [プリンタ名] [印刷したいファイル]
See “5.1. Printer locations” to check the printer name. For example, to use the printer “ps00,” enter as follows.
% lp -d ps00 file.ps
You can print text files by using the “a2ps” command.
% a2ps [印刷したいファイル]
By specifying options in the “a2ps” command, you change the output format such as the maximum number of rows per page and the paper orientation. For more information, please see details of the “man” and “a2ps” commands.
6. Password management
Password management is very important. ChangePassword-en.pdf![]()
The password must satisfy the following conditions:
- Length between 12 and 127 one-byte characters
- No user account name, family name, or first name should be included.
- You cannot use a previous password.
- Use at least three types of characters out of the following four categories.
- Upper-case alphabetical letters (A-Z)
- Lower-case alphabetical letters (a-z)
- Numbers (0-9)
- Symbols ($, #, %, etc.)
(Please regularly change your password for security. We recommend that you create a password with more than eight one-byte alphanumerical letters.)
To change the password, access your personal settings.
Notes
- Your password is commonly used for Dream Campus, e-mail, Wi-Fi, VPN, the library system, and travel expenses systems.
- If you missed or lost your password, please contact the counter of Information and Media center on the first floor.
You must choose a password that is easy for you to remember, but difficult for others to guess. Refer to the following recommendations.
● Password settings considerations
・Avoid choosing an easy password, which includes simple words, place names, personal names, and reversed spelling and/or the addition of numbers to such words.
・Make a lengthy password. A password with more than 12 one-byte characters is recommended.
・Use many types of characters. Use not only lowercase alphabetical letters, but also uppercase letters, numbers, and special characters.
・Regularly change the password.
Good password examples (something easy for you to remember and difficult for others to guess):
・Combine two words and include numbers in-between.
Example: combine location, extension number, and abbreviation (“tempaku66 <!> 39 imc”).
・Set a favorite phrase and insert numbers in-between.
(Or letters may be replaced with numbers with a similar sound in Japanese.)
Example: “keisankicenter” may be converted to “kei3ki1000ta.”
: “sekainihitotsudakenohana” may be converted to “sekaI2hIto2dakeno87.”
* Create your password in your own way.
Bad password examples:
・Same as the login name. Using all uppercase letters and simply repeating a name may be insufficient.
・Name of your, spouse, children, parents, pets, friends, or colleagues.
・Name of a favorite character or your boss. Common personal names.
・Name operating system or host computer you are using.
・A part or all of your birthday, phone number, driver’s license number, insurance number, or readily available your personal information.
・Phrases available from English or foreign language dictionaries.・Name of a place or a proper noun.
・A series of the same letter, or simply following the letters in the layout of the keyboard (such as (“qwerty” or “qawsedrf”).
Source: Information Security Dictionary, Norihisa Tsuchiya, Kyoritsu Shuppan.